> ## Documentation Index
> Fetch the complete documentation index at: https://docs.pyannote.ai/llms.txt
> Use this file to discover all available pages before exploring further.
# Quickstart guide
> Get started with the pyannoteAI API in 5 minutes
Learn how to create an account, generate an API key, and make your first API call.
Want to test the latest models without writing code? Try the [API playground](/tutorials/api-playground)
Sign up for a free account at [dashboard.pyannote.ai](https://dashboard.pyannote.ai) to access the pyannoteAI platform.
1. Go to [dashboard.pyannote.ai](https://dashboard.pyannote.ai)
2. Signup with your work email or use your GitHub account to register
3. Complete your account setup
Once registered, you'll have access to your team dashboard where you can manage API keys, view usage statistics, and access billing details.
Need help with setup or billing? See [Account](/administration/account) and [Billing](/administration/billing).
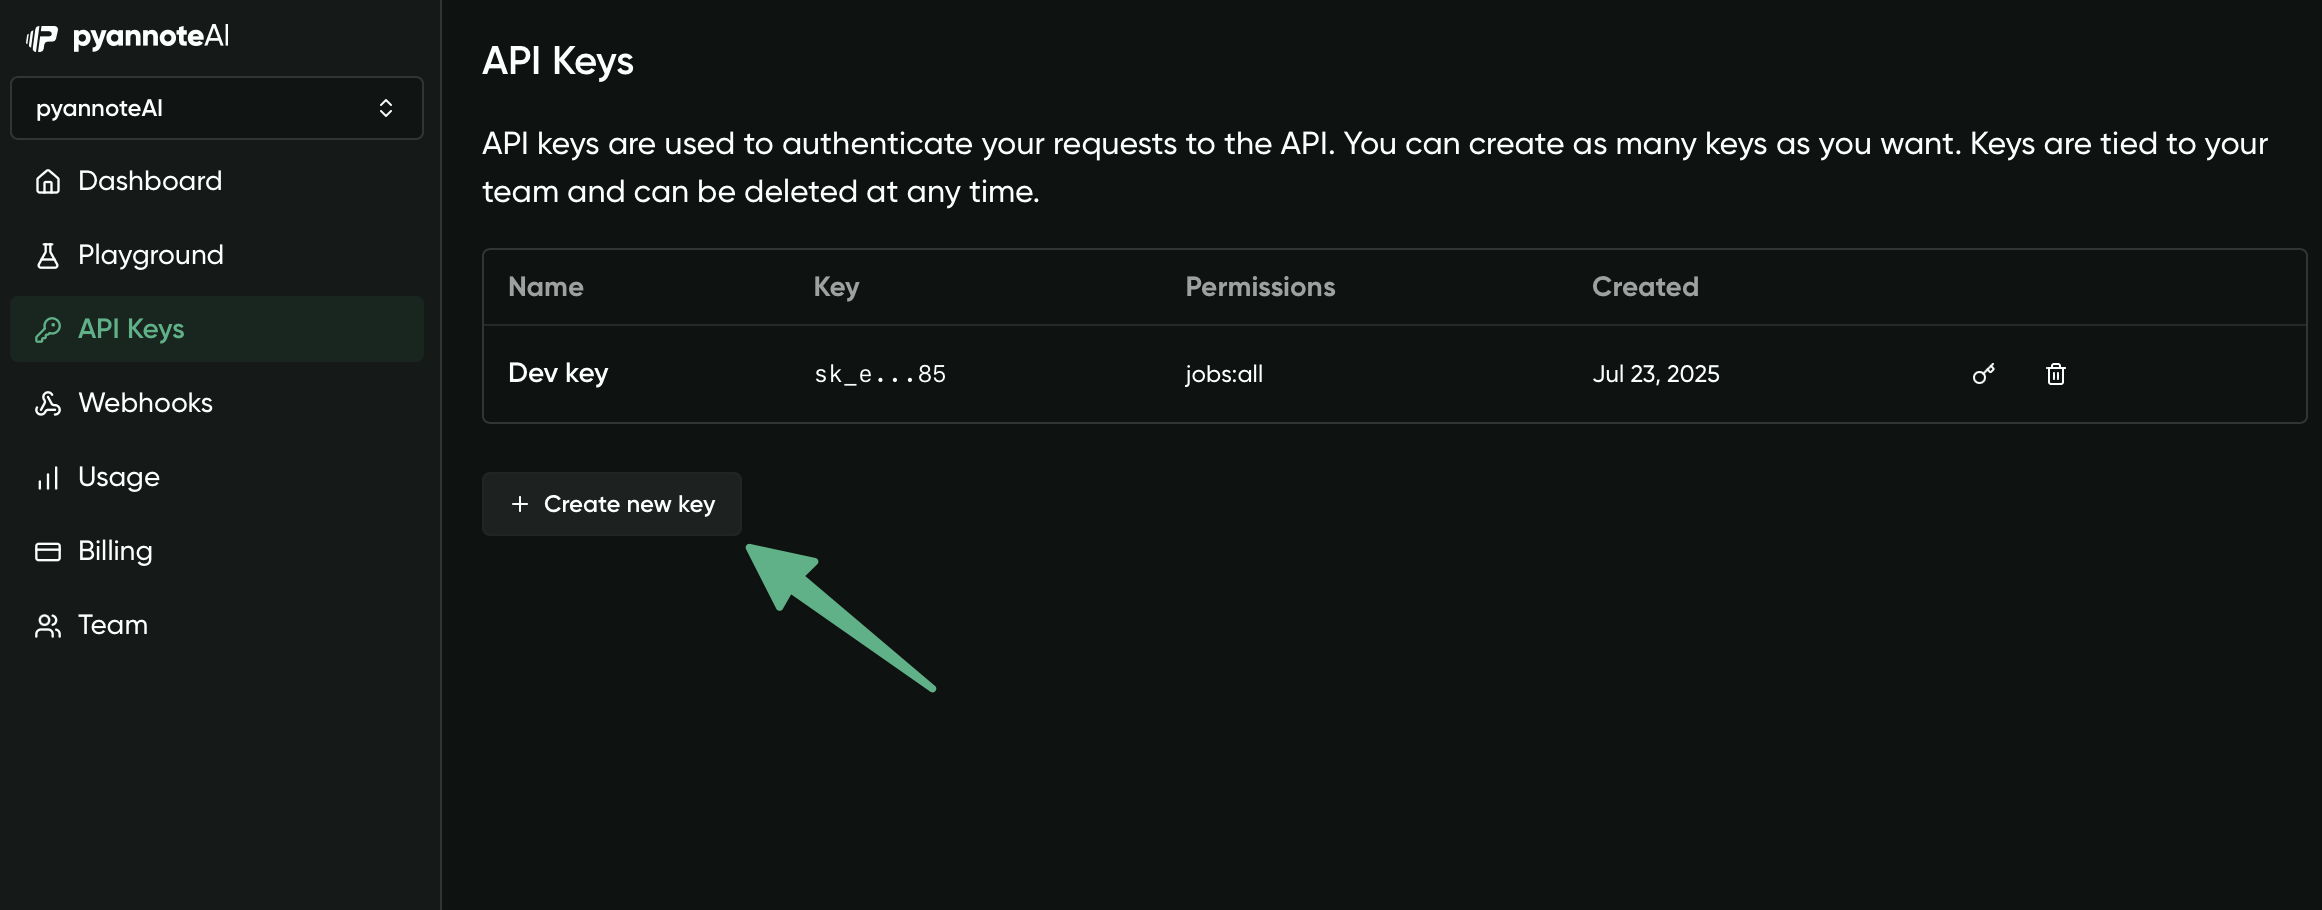
Generate an API key to authenticate your requests to the pyannoteAI API.
1. In your dashboard, navigate to the **API Keys** section
2. Click **"Create new key"**
3. Give your key a descriptive name (e.g., "Development key")
4. Copy the key and store it securely (you won't be able to see it again after you leave the page)
 Keep your API key secure and never expose it in client-side code or public repositories.
Verify your API key is working by making a test request to our test endpoint.
```bash Test API Call theme={null}
# Set your API key as an environment variable in production
# export PYANNOTE_API_KEY="your_api_key_here"
curl --request GET \
--url https://api.pyannote.ai/v1/test \
--header 'Authorization: Bearer YOUR_API_KEY_HERE' \
--header 'Content-Type: application/json'
```
```python test.py theme={null}
import requests
api_key = "YOUR_API_KEY_HERE" # In production, use environment variables: os.getenv("PYANNOTE_API_KEY")
url = "https://api.pyannote.ai/v1/test"
response = requests.get(url, headers={"Authorization": f"Bearer {api_key}"})
print(response.json())
```
```typescript test.ts theme={null}
const apiKey = "YOUR_API_KEY_HERE"; // In production, use environment variables: process.env.PYANNOTE_API_KEY
const url = "https://api.pyannote.ai/v1/test";
const response = await fetch(url, {
headers: {
Authorization: `Bearer ${apiKey}`,
},
});
console.log(await response.json());
```
If successful, you'll receive a response like:
```json theme={null}
{
"message": "API key is valid",
"status": "success"
}
```
## What's next?
Now that you have a working API key, you can start building with pyannoteAI.
Learn how to submit audio files for speaker diarization and process the
results.
Explore the complete API documentation for all available endpoints.
### Need help?
* 📖 Browse our [tutorials](/tutorials) for step-by-step guides
* ❓ Check our [FAQs](/support/faqs) for common questions
* 💬 Join our [Discord community](https://discord.gg/vux8UH9QmV) for support
* 📧 Email us at **[support@pyannote.ai](mailto:support@pyannote.ai)**
Keep your API key secure and never expose it in client-side code or public repositories.
Verify your API key is working by making a test request to our test endpoint.
```bash Test API Call theme={null}
# Set your API key as an environment variable in production
# export PYANNOTE_API_KEY="your_api_key_here"
curl --request GET \
--url https://api.pyannote.ai/v1/test \
--header 'Authorization: Bearer YOUR_API_KEY_HERE' \
--header 'Content-Type: application/json'
```
```python test.py theme={null}
import requests
api_key = "YOUR_API_KEY_HERE" # In production, use environment variables: os.getenv("PYANNOTE_API_KEY")
url = "https://api.pyannote.ai/v1/test"
response = requests.get(url, headers={"Authorization": f"Bearer {api_key}"})
print(response.json())
```
```typescript test.ts theme={null}
const apiKey = "YOUR_API_KEY_HERE"; // In production, use environment variables: process.env.PYANNOTE_API_KEY
const url = "https://api.pyannote.ai/v1/test";
const response = await fetch(url, {
headers: {
Authorization: `Bearer ${apiKey}`,
},
});
console.log(await response.json());
```
If successful, you'll receive a response like:
```json theme={null}
{
"message": "API key is valid",
"status": "success"
}
```
## What's next?
Now that you have a working API key, you can start building with pyannoteAI.
Learn how to submit audio files for speaker diarization and process the
results.
Explore the complete API documentation for all available endpoints.
### Need help?
* 📖 Browse our [tutorials](/tutorials) for step-by-step guides
* ❓ Check our [FAQs](/support/faqs) for common questions
* 💬 Join our [Discord community](https://discord.gg/vux8UH9QmV) for support
* 📧 Email us at **[support@pyannote.ai](mailto:support@pyannote.ai)**